Excerpt

Recently, I got a Rails app running on AWS Elastic Beanstalk for the first time. I wanted to share the steps to do so here. Although there are other tutorials, AWS and Rails both change over time, so some of these steps here are updated compared to other tutorials.
Since AWS is so complex, a lot of tutorials assume prior AWS knowledge as well; this one walks you through everything you need step by step.
In this tutorial, we’ll cover how to:
- Get an Elastic Beanstalk instance running the default sample Ruby application, including logging
- Create a fresh “hello world” Rails app
- Configure the Rails app to automatically deploy to Elastic Beanstalk using AWS CodePipeline
- Optionally, set up a custom domain for the app with NameCheap
- Optionally, set up SSL for the app
I say “optionally” for the last two steps because if you aren’t ready to register a custom

Recently, I got a Rails app running on AWS Elastic Beanstalk for the first time. I wanted to share the steps to do so here. Although there are other tutorials, AWS and Rails both change over time, so some of these steps here are updated compared to other tutorials.
Since AWS is so complex, a lot of tutorials assume prior AWS knowledge as well; this one walks you through everything you need step by step.
In this tutorial, we’ll cover how to:
- Get an Elastic Beanstalk instance running the default sample Ruby application, including logging
- Create a fresh “hello world” Rails app
- Configure the Rails app to automatically deploy to Elastic Beanstalk using AWS CodePipeline
- Optionally, set up a custom domain for the app with NameCheap
- Optionally, set up SSL for the app
I say “optionally” for the last two steps because if you aren’t ready to register a custom domain or set up SSL, you can stop before that point and the application will still work.
Note that we won’t be covering database setup. This is just because I didn’t run across that myself because I’m using a pre-existing database on another service. Amazon does have an RDS service for providing relational databases like Postgres and MySQL. Also, although the demo app here is a Rails server-rendered app, these steps would work the same for Rails APIs such as REST or GraphQL.
Note that this doesn’t cover more advanced server configurations such as multiple instances, test and staging environments, and zero-downtime deployments.
Another important note: AWS costs money. The instance size we need to use for Rails is too big for the free tier, so you’ll be charged for it, and there’s a limit to how many build minutes can be run in the free tier as well. So keep an eye on your usage, and spin down the application if you aren’t using it.
This tutorial was written in February 2024 using Ruby 3.2 and Rails 7.1.3.
## Getting an Elastic Beanstalk instance running
Go to the AWS Management Console and sign in or sign up. In the Search box, type “Elastic Beanstalk” and click the Elastic Beanstalk link.
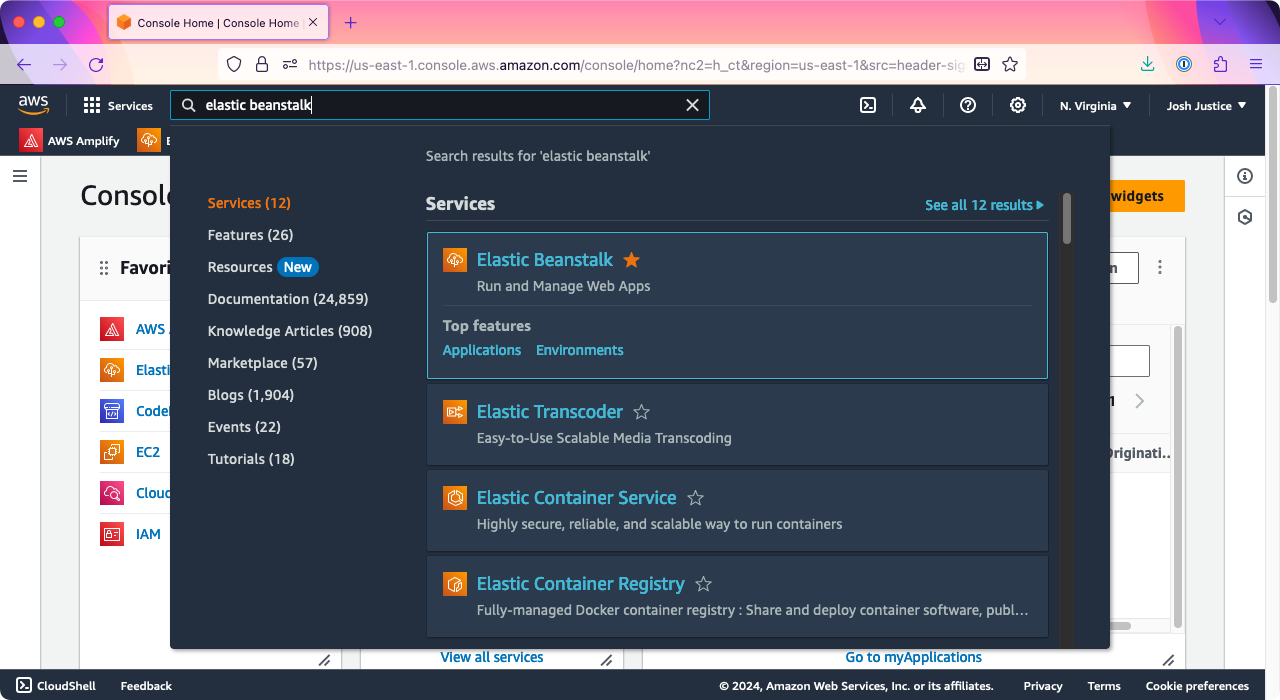
Search for "Elastic Beanstalk" in the AWS Console search box.
From the Elastic Beanstalk home page, click “Create application.”
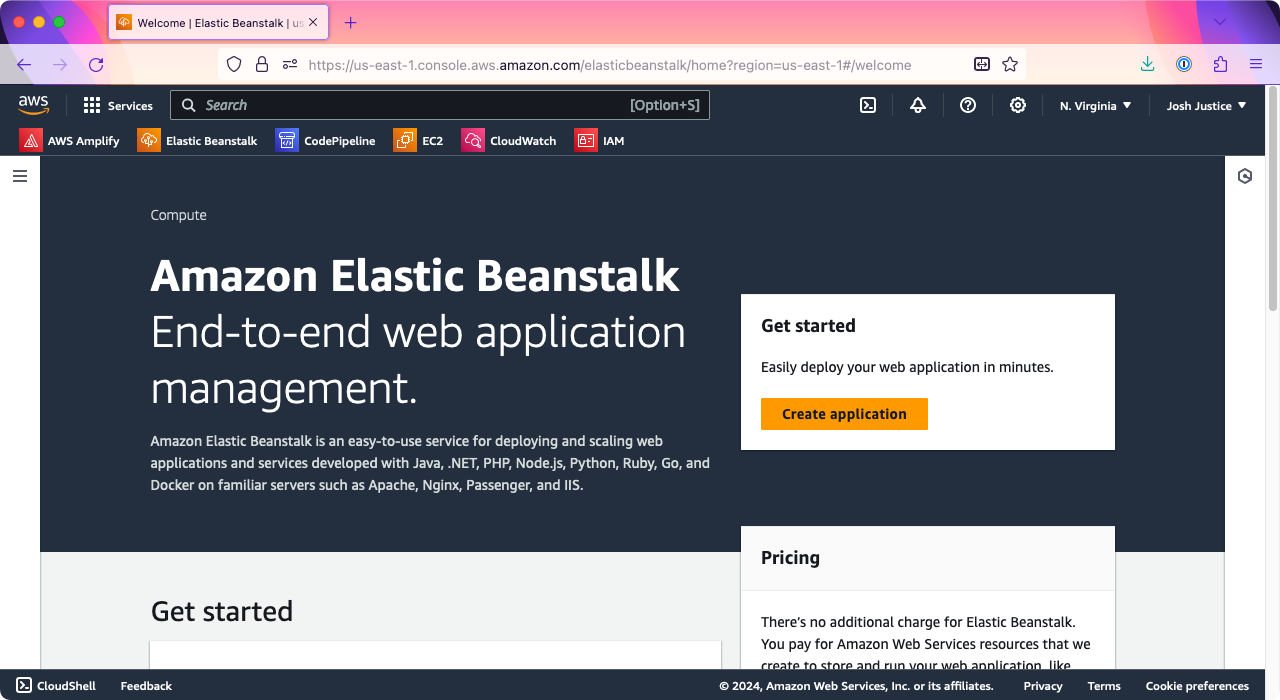
On the Elastic Beanstalk home page, click "Create application."
You’ll be taken to the “Configure environment” screen. Under “Environment tier,” make sure “Web server environment” is selected. Under “Application information,” type a name for your application; I’ll do “rails-eb”.
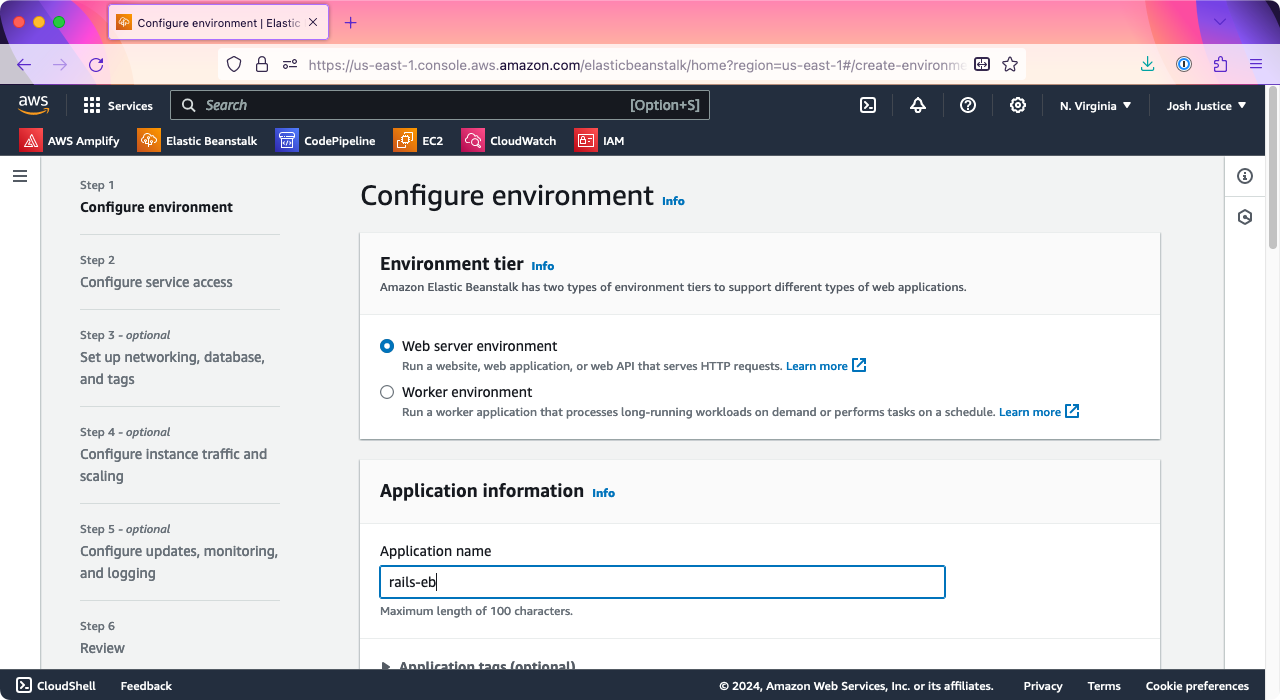
Enter "rails-eb" as the application name.
Under “Platform” > “Platform,” choose Ruby.
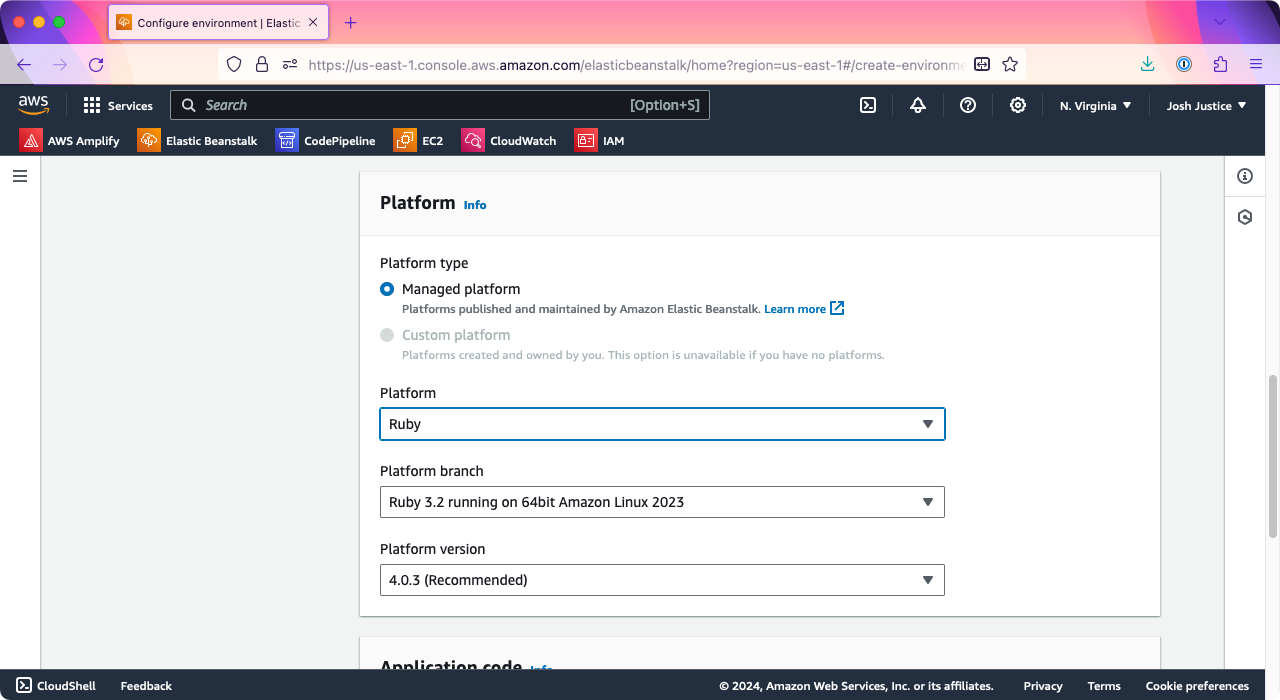
Choose Ruby as the platform.
Under “Application code,” make sure “Sample application” is chosen; we’ll use the pre-provided Ruby sample first, then set up uploads via CodePipeline later.
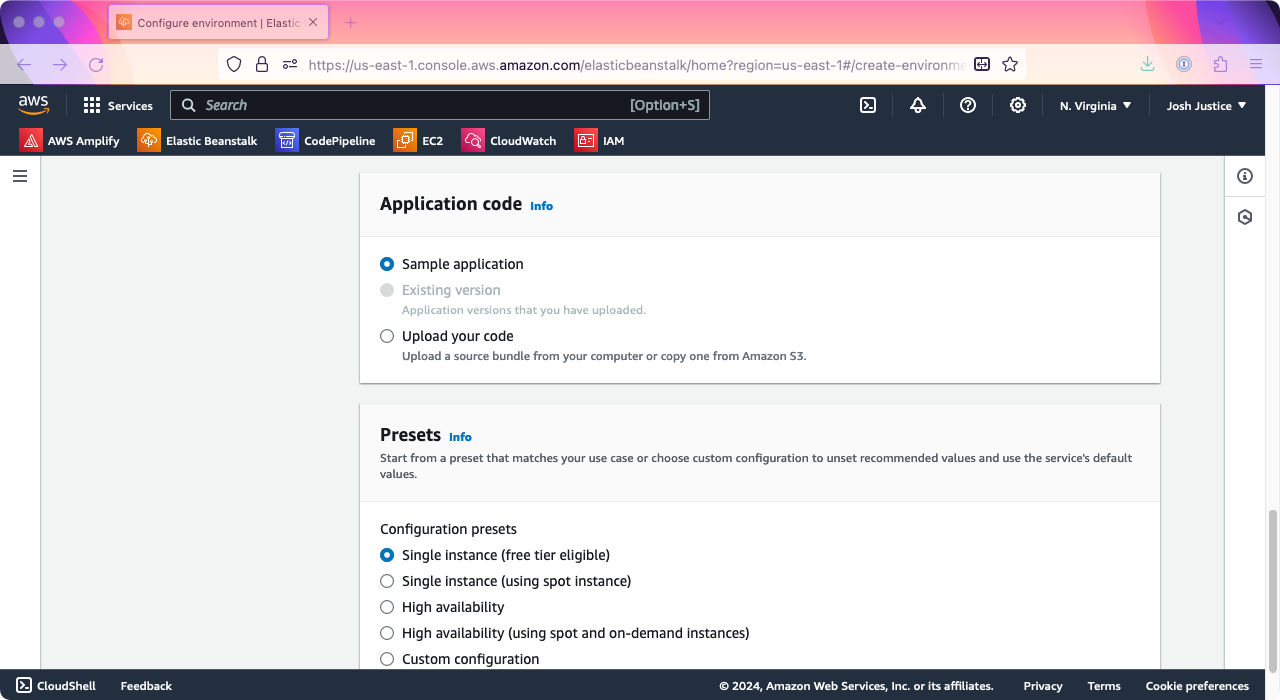
Under "Application Code," keep "Sample application" selected for now.
Click “Next.”
You’ll see the “Configure service access” screen. You may see some pre-existing service roles preselected; if not, choose “Create and use new service role.”
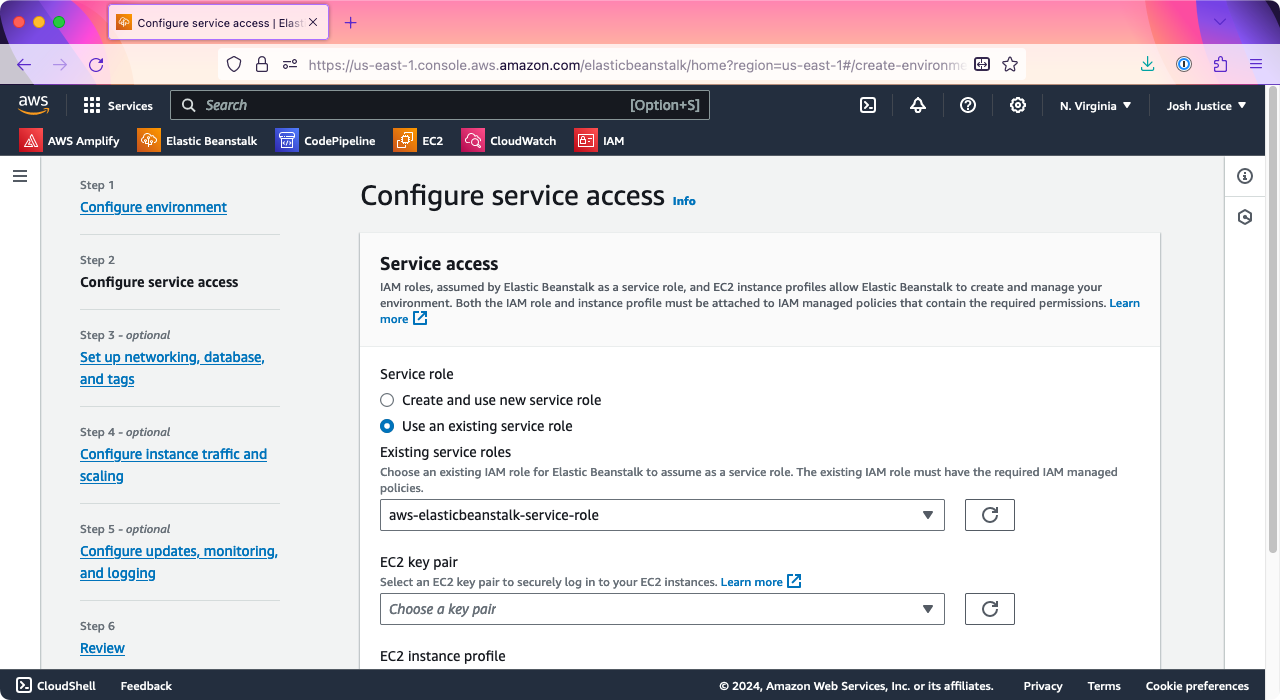
The "Configure service access" step of the Elastic Beanstalk application creation wizard.
Click “Next.”
On the “Set up networking, database, and tags” screen, scroll to the bottom and click “Next.”
On the “Configure instance traffic and scaling” screen, scroll down to “Capacity,” then find “Instance types.” You should see “t3.micro” and “t3.small” listed by default. Click the X next to “e3.micro” to remove it so that only “t3.small” is shown. When I tried to run a Rails app on a “t3.micro” instance, the bundle installstep would hang, so I found that “t3.small” or larger is needed.
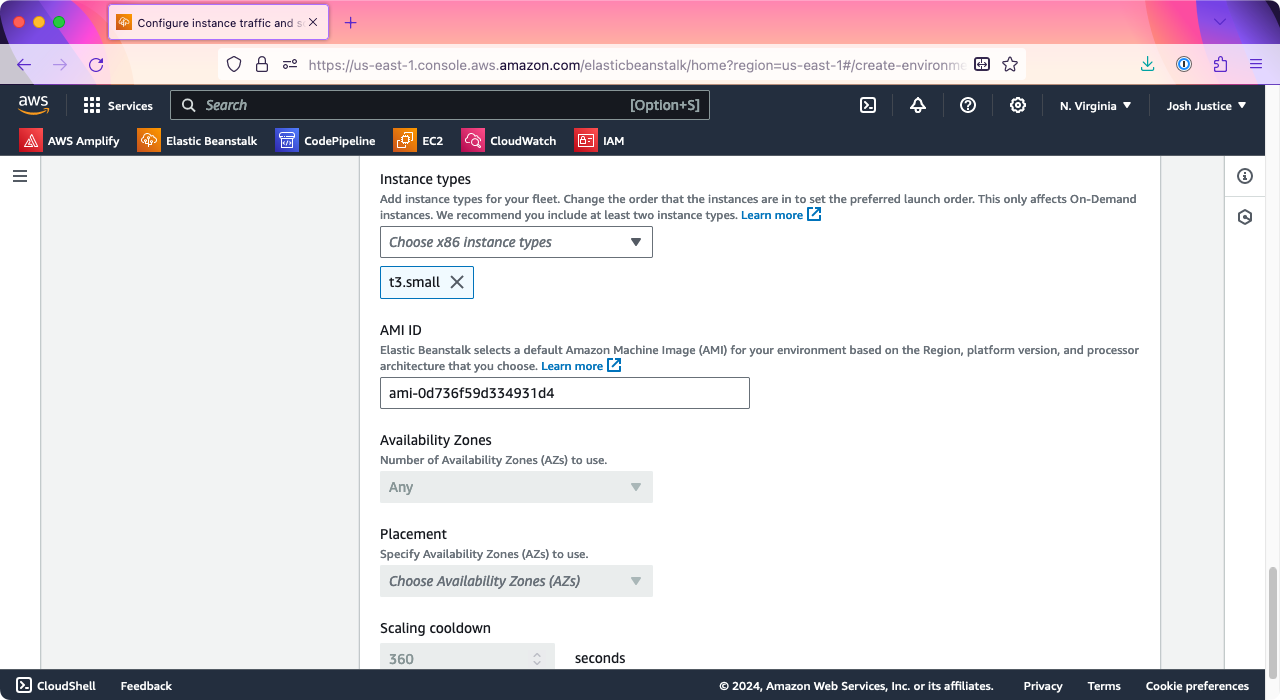
Make sure to remove the "t3.micro" instance type and only leave "t3.small," or else you may get deployment errors.
Click “Next.”
On “Configure updates, monitoring, and logging,” scroll down to “Platform software.” Under “Instance log streaming to CloudWatch logs,” set “Log streaming” to “Activated.” (Note that this is different from “Health event streaming to CloudWatch logs” further up on the page.)
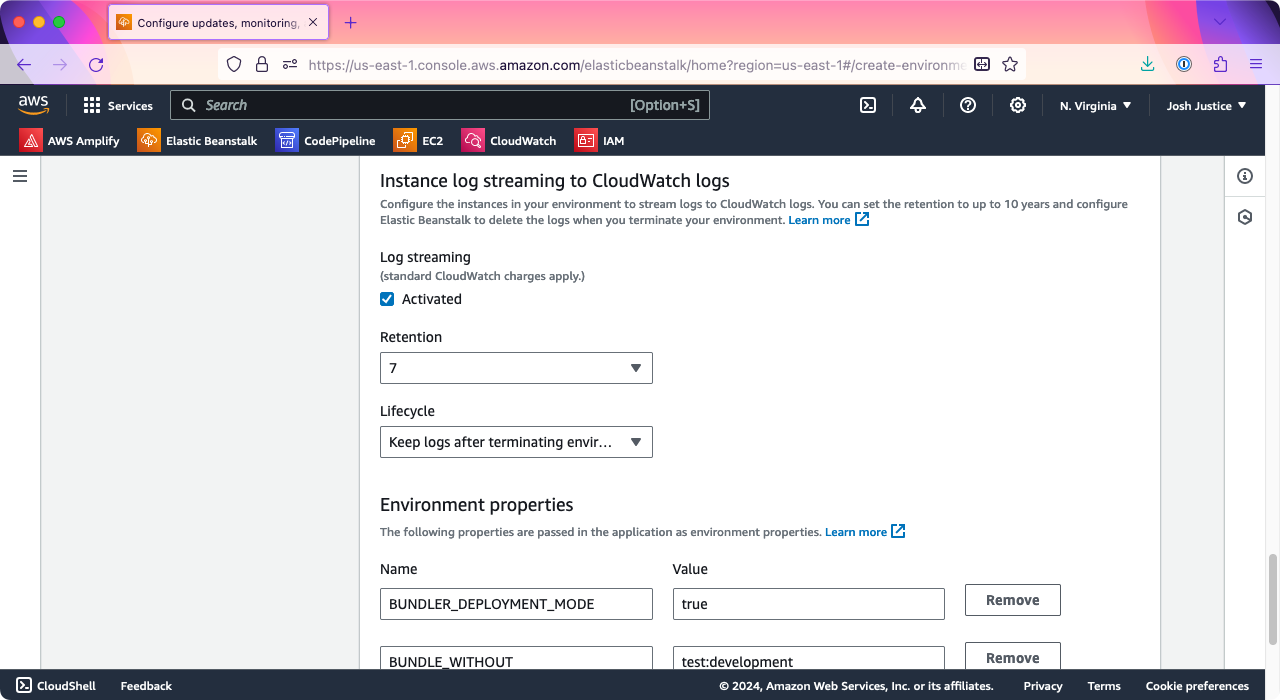
Check "Activated" for "Log streaming" under "Instance log streaming to CloudWatch logs"
Under “Environment properties,” we will need to add a SECRET_KEY_BASE value for Rails. One way to generate one is to run irb in your console and run the following commands:
```plain text
irb(main):001> require 'securerandom'=> true
irb(main):002> SecureRandom.hex(64)
=> "(a 64-character string)"
```
Under “Environment properties,” click “Add environment property,” then type “SECRET_KEY_BASE” in the “Name” column and paste the secret key base value you generated into the Value column.
Enter the string value you generated above as the value for property SECRET_KEY_BASE
Click “Next.”
On the “Review” screen, scroll down and click “Submit.”
You’ll be taken to the screen for the new environment that was created. Yours will probably be the name of your application with “-env” on the end. Mine has a “-1” as well (“Rails-eb-env-1”) because I previously created a “Rails-eb-env” while writing this tutorial.
You’ll see a message that says: “Elastic Beanstalk is launching your environment. This will take a few minutes.”
Elastic Beanstalk will launch your environment.
You can watch the launch process at the bottom of the page under Events. Eventually, you should see the message “Environment successfully launched.”
Elastic Beanstalk will let you know when it's succeeded in launching your environment.
At the top of the page, under Environment overview > Domain, you’ll see a URL ending with .elasticbeanstalk.com.
Click the link under "Domain" to see your new server.
Click it, and you should see a page that says: “Congratulations. Your first AWS Elastic Beanstalk Ruby Application is now running on your own dedicated environment in the AWS Cloud.”
The success message for the Elastic Beanstalk Ruby sample application.
Let’s confirm that our logs are working too. At the top of the page in the search box, type “CloudWatch”.
Search for "CloudWatch" in the AWS Console search box.
Open the CloudWatch link in a new browser tab so that your Elastic Beanstalk tab stays open too.
In CloudWatch, click “Logs” > “Log groups,” then look for a line that includes the name of your environment—in my case, it added “-env” to the name of my app, which was “Rails-eb”. You should see several files for that environment; look for the one ending in “/eb-engine.log” and click it.
The CloudWatch "Log groups" page, showing a series of log groups for Rails-eb-env-1.
(If you don’t see it, you may have missed the “Instance log streaming to CloudWatch logs” checkbox in application setup; if so, you can go to your “Environment” under Elastic Beanstalk, then “Configuration,” then “Updates, monitoring, and logging,” click “Edit,” and activate those logs.)
On the eb-engine.log page, go to “Log streams,” then click the link you see.
A "Log groups" page in CloudWatch, showing a list of "Log streams."
You should see a log of deployment output.
If logging is working, you should see log output ending with "Platform Engine finished execution."
This will be helpful to watch for future deployments; leave this browser tab open.
## Creating a Sample Rails App
So, we have an Elastic Beanstalk instance running the sample code. Next, let’s get it running our own code.
To do so, let’s create a sample Rails app to run. You may be tempted to use your real Rails app, but I’d encourage creating the sample app first instead. Your app may need additional setup that can cause errors, so let’s take the agile small step of deploying a trivial app first. I’ll keep it quick!
First, we need to make sure we’re running a version of Ruby that runs on Elastic Beanstalk. Go to Elastic Beanstalk’s Supported Platforms page and check the version of Ruby listed; it’s 3.2.2 as of this writing.
Next, check the version of Ruby you have running locally. Here’s the result for me:
```plain text
$ ruby -v
ruby 3.2.2 (2023-03-30 revision e51014f9c0) [arm64-darwin22]
```
If your version of Ruby is newer than the one Amazon lists, install 3.2.2 via a tool like rbenv.
Once you have the right Ruby version, run rails -v and make sure you have Rails 7.1.3 or later installed. If not, run gem update rails.
Next, create a new Rails application with all the defaults:
```plain text
$ rails new rails-eb
```
After the new command is done, create a welcome page:
```plain text
$ cd rails-eb
$ rails generate controller WelcomePage welcome
```
Replace the contents of app/views/welcome_page/welcome.html.erb with:
```plain text
<h1>Rails on Elastic Beanstalk</h1>
```
Then, in config/routes.rb, add the following:
```plain text
Rails.application.routes.draw do
get 'welcome_page/welcome'
+ root 'welcome_page#welcome'...
```
Test this by running your app with rails s, then going to http://127.0.0.1:3000. You should see the “Rails on Elastic Beanstalk” message you entered.
You should be able to see your welcome message running Rails locally.
There’s one more temporary change we need to make. By default, Rails enforces SSL security in production. This is very good, but to make sure we can confirm our app is working before we set up SSL, we’re going to turn that off. If you do this for a real app, make sure you turn SSL back on before you send users to it!
Open config/environments/production.rb and change config.force_ssl to false
```plain text
# Force all access to the app over SSL, use Strict-Transport-Security, and use secure cookies.
-config.force_ssl = true+config.force_ssl = false # TEMPORARY for testing
```
Create a GitHub repository for your Rails app and push the code up to it.
## Deploy with CodePipeline
Now we’ll set up our Rails code to be deployed to our Elastic Beanstalk instance using CodePipeline.
Open yet another new browser tab and go to the AWS Management Console. Search for “CodePipeline”, then click the CodePipeline link.
Search for "CodePipeline" in the AWS Console search.
Click “Create pipeline.”
The CodePipeline Pipelines page.
You’ll see the “Choose pipeline settings” page. Under “Pipeline settings” > “Pipeline name,” enter a name; you can call it the same as your application, which for me is “rails-eb”.
Enter "rails-eb" as the "Pipeline name."
Scroll down to “Service role” and make sure “New service role” is selected; you can keep the default “Role name.”
The "Choose pipeline settings" page of the CodePipeline "Create pipeline" wizard. Under "Service role," "New service role" is selected.
Click “Next.”
On the “Add source stage” screen, under “Source provider,” choose “GitHub (Version 2).”
Choose "GitHub (Version 2)" as the "Source provider."
Click “Connect to GitHub” to sign in to your GitHub account and give AWS access to your sample Rails app repo. Under “Repository name,” choose your Rails app repo. Under “Branch name,” choose the branch to deploy, which is probably “main” unless you changed it.
Once CodePipeline says that "Your GitHub connection is ready to use," choose the repository and branch to deploy.
Under “Trigger,” choose a “Trigger type” of “Specify filter.” For “Event type” choose “Push,” for “Filter type” choose “Branch,” and under “Branches” > “Include” type “main”.
The "Trigger" section of the CodePipeline "Create pipeline" wizard. It is configured to trigger on pushes to the main branch.
Click “Next.”
Under “Add build stage,” click “Skip build stage.” This isn’t one of those compiled languages! (Running bundle install doesn’t count as a build here.) Click “Skip” to confirm that you don’t want to be bothered with compilation.
On the “Add deploy stage” screen, under “Deploy provider” choose “AWS Elastic Beanstalk.” For “Application name” and “Environment name” choose your EB application and environment.
The "Deploy" step of the CodePipeline "Create pipeline" wizard. It is configured to deploy to the Elastic Beanstalk environment Rails-eb-env-1.
Click “Next.”
You’ll see a “Review” screen; scroll down and click click “Create pipeline.”
After a few seconds, you’ll be taken to the screen for your new pipeline and see the message “Congratulations! The pipeline (name) has been created.”
CodePipeline will let you know when your pipeline is created, and it will begin a deployment.
You’ll also see a two-part diagram showing the steps of your pipeline, and it will begin executing. Warning! It’s possible your Deploy step will fail. If it succeeds, skip down to Install Success below. Otherwise, keep reading.
If your install fails, click “View details” to see why. I’ve run across the following error message (emphasis mine):
> Deployment failed. The provided role does not have sufficient permissions: Failed to deploy application. Service:AWSLogs, Message:User:
…/AWSCodePipelineServiceRole-… is not authorized to perform: logs:CreateLogGroup
If that happens, that means there’s a permissions issue. By default, the role CodePipeline created isn’t granted access to write the logs that we said we wanted created. To fix this, we’ll need to make a change in IAM, AWS’s auth tool.
First, copy the name of the role listed here. Then, in the search bar, search for IAM then open the link in a new tab (just “IAM,” not the “IAM Identity Center”).
In IAM, click “Role.” In the search box under “Roles,” paste the role name you copied from the error message. It should match one result; click it.
Under “Permissions” > “Permissions policies,” click “Add permissions” > “Attach policies.” Search for “CloudWatchLogsFullAccess”, then next to the row that’s shown, click the checkbox and click “Add permissions.” You should be taken back to the role page, and the CloudWatchLogsFullAccess permission should now be listed in the “Permissions policies” box.
With permissions fixed, go back to the browser tab with CodePipeline. In the Deploy box, click “Retry stage.” This can take a little while, and we can watch the process in more detail in CloudWatch logs. Scroll to the bottom and click the “Resume” link to get the logs updated live. After a few seconds, you should see a “Starting…” line. It may stop at the bundle _2.4.10_ install line for a bit. (If it hangs at bundle _2.4.10_, you may have accidentally left “t3.micro” in your settings; if so, go back to the Elastic Beanstalk settings and configure it to only use “t3.small” instance size.)
## Install Success
Once the install succeeds, you’ll eventually see Platform Engine finished execution on command: app-deploy.
If your deployment succeeds, CloudWatch logs will end with the message "Platform Engine finished execution."
Back in CodePipeline, the Deploy stage will turn green for “Succeeded.”
A CodePipeline page showing a Deploy step that has succeeded.
If you still have your browser tab open from the first time we checked the Elastic Beanstalk instance, you can reload it to see your running app. If not, go back to Elastic Beanstalk, pull up your environment, and click the “Domain” link again. You should see your “Rails on Elastic Beanstalk” message.
The "Rails on Elastic Beanstalk" message rendered by an instance on elasticbeanstalk.com
We’ve now got a Rails app running on Elastic Beanstalk, and each time you push commits up to the main branch, they’ll be automatically deployed!
If that’s where you’d like to stop, we’ve made good progress. But if you have a custom domain name, we can add a custom subdomain and SSL to the app as well.
## Adding a Custom Domain
AWS has its own service for registering custom domains and configuring DNS, called Route 53. However, you can use a different DNS provider, and I kind of like keeping my domains separate from any particular hosting platform. I use NameCheap.com for my DNS, so I’ll provide instructions for setting it up with NameCheap.
To make your Elastic Beanstalk instance accessible using a custom domain, we just need to create a CNAME record in your domain’s DNS. The “host” value should be the subdomain you want to use. In my case, I own codingitwrong.com, so I’ll create a rails-eb subdomain, so the site can be accessed at rails-eb.codingitwrong.com. (This won’t be running by the time you read this post, so I don’t have to keep paying AWS for that server!)
For the CNAME “value,” put the domain name of your EB instance, without http:// on the front or a / on the end, and with a . added to the end. For example, my instance was http://rails-eb-env-1.eba-jad9rjd9.us-east-1.elasticbeanstalk.com/, so for the “value” I put rails-eb-env-1.eba-jad9rjd9.us-east-1.elasticbeanstalk.com.
Add a CNAME record for rails-eb in your DNS provider's interface, pointing to your subdomain on elasticbeanstalk.com
After saving the DNS entry, depending on your DNS, it can take a little while to take effect. For me, it took 1-5 minutes. After that, I was able to go to http://rails-eb.codingitwrong.com and see my running app. Nice!
The "Rails on Elastic Beanstalk" message rendered by rails-eb.codingitwrong.com
## Adding HTTPS
A running app is good, but in 2024 you probably want HTTPS even if your site doesn’t handle any secure information. Thankfully, it’s not too hard to set this up with AWS: it will issue us an SSL certificate using the AWS Certificate Manager.
In the AWS search box, search for “Certificate Manager,” then open the “Certificate Manager” link in a new browser tab.
Search for "Certificate Manager" in the AWS Console search.
Click “Request a certificate.”
On the “Request certificate” screen, under “Certificate type,” make sure “Request a public certificate” is selected, then click “Next.”
On the “Request public certificate” screen, under “Domain names” > “Fully qualified domain name,” enter your full subdomain — in my case, rails-eb.codingitwrong.com. Under “Validation method,” keep “DNS validation - recommended” selected. Click “Request.”
Enter your domain name in the "Fully qualified domain name" field.
You will be taken to the Certificates page, and a message will show that says: “Successfully requested certificate with ID …. A certificate request with a status of pending validation has been created. Further action is needed to complete the validation and approval of the certificate.”
Certificate Manager will let you know when it's successfully requested the certificate.
Click the “View certificate” button.
You will see the page for your certificate. Under “Domains,” your domain will be listed with a status of “Pending validation.” You should see values in the “CNAME name” and “CNAME value” columns. If not, wait a few seconds and reload the page.
Once you have the CNAME name and value, you will need to create a CNAME entry under your domain to confirm you own it. Go back into your DNS provider and add them. Note that although the “CNAME name” has the domain suffix, in NameCheap at least I only needed to paste the “subdomain” part into the CNAME name field, so if AWS gave _123456890abcdef.rails-eb.codingitwrong.com., then I would only paste _123456890abcdef.rails-eb. For the value, paste the full value ending in .acm-validations.aws.
Save the DNS record. Again, depending on how quickly your particular DNS propagates, it may take a few minutes before AWS Certificate Manager sees the result. For me, it took about five minutes. Keep reloading the certificate page, and when it’s working, you will see “Issued” for the status.
When you've validated that you own the domain name, Certificate Manager will show that it has "Issued" your certificate.
After this, you’ll need to set up your Elastic Beanstalk instance to use that certificate. Go back to Elastic Beanstalk, open your environment, and go to “Configuration.” Under “Instance traffic and scaling,” click “Edit.”
Click "Edit" under "Instance traffic and scaling" in Elastic Beanstalk.
Under “Capacity” > “Auto scaling group” > “Environment type,” change it from “Single instance” to “Load balanced.” This isn’t because we need more than one instance; we just need a load balancer to set up HTTPS on. Under “Instances,” change “Max” from 4 to 1 to avoid being charged for multiple instances.
Configure "Environment type" to "Load balanced," Min to 1, and Max to 1.
Now that you’ve changed the environment type to load balanced, further down on the page, you should see a “Listeners” section with port 80 listed.
Under Listeners, click "Add listener"
Click “Add listener.” For “Listener port,” type 443, the standard HTTPS port number. For “Listener protocol,” choose HTTPS. For “SSL certificate,” choose the certificate for the subdomain that you just created.
Enter Listener Port 443, Listener Protocol HTTPS, and for SSL Certificate choose the domain you had the certificate issued for.
Then click “Save.” There’s one more step: scroll down to the bottom of the page, then click “Apply.”
Click "Apply"
Elastic Beanstalk will take some time to set up the new load balancer. Watch the Events and wait for it to say “Environment update successfully completed.”
Elastic Beanstalk will let you know when the environment update is successfully completed.
Now, go to the https:// version of your URL, which, in my case, is https://rails-eb.codingitwrong.com. It may still take a few seconds before it’s ready (it did in my case), but soon, your app should be available over HTTPS!
A web browser showing the site https://rails-eb.codingitwrong.com. The security menu says 'You are securely connected to this site.'
Now that that’s working, it would be best for us to re-enable Rails force_ssl, so that users can’t accidentally access it over HTTP. Change the config value back:
```plain text
# Force all access to the app over SSL, use Strict-Transport-Security, and use secure cookies.
-config.force_ssl = false # TEMPORARY for testing+config.force_ssl = true
```
You can change your welcome message, too, so you can be sure when the update is deployed:
```plain text
-<h1>Rails on Elastic Beanstalk</h1>+<h1>SECURE Rails on Elastic Beanstalk</h1>
```
Commit these changes and push them up to GitHub. You should see a redeployment be triggered in the Elastic Beanstalk Events.
Once the deployment is done, it’s a good idea to test that SSL protection is in place. Run the following from the terminal, putting in your subdomain (note the HTTP instead of HTTPS):
```plain text
$ curl -v http://rails-eb.codingitwrong.com
```
If this outputs the HTML of your web page, this means the SSL protection is not working. But if it is working, you will see something like the following:
```plain text
< HTTP/1.1 301 Moved Permanently
< Date: Sat, 17 Feb 2024 11:17:38 GMT
< Content-Type: text/html; charset=utf-8
< Content-Length: 0
< Connection: keep-alive
< Server: nginx
< location: https://rails-eb.codingitwrong.com/
```
The 301 redirecting the user to the https URL means that Rails is not serving up the app over HTTP. Nice and secure!
Now you’re all set with a Rails app running on Elastic Beanstalk with a custom domain and HTTPS. Remember that you’ll be charged for these running services, so be sure to spin them down if you want to avoid that. You can always run through this tutorial again in the future to get another Rails app set up.
## Resources
If you’d like to learn more about AWS, here are some of the resources I used while getting my Rails app running:
- Deploying a Rails application to Elastic Beanstalk by AWS
- AWS Elastic Beanstalk gotchas with Rails by Rachel Chervin
- How to map custom domain name for AWS Elastic Beanstalk by Colin Toh
- Udemy course: Amazon Web Services (AWS) with JavaScript & NodeJS by Parwiz Forogh
### Related Insights
🔗DevOps best practices using AWS and Terraform
🔗How to protect against AWS S3 misconfiguration breaches
🔗Migrating legacy APIs to serverless with AWS
Letter art spelling out NEAT

## Join the conversation
Technology is a means to an end: answers to very human questions. That’s why we created a community for developers and product managers.
Explore the community
Test Double Executive Leadership Team

## Learn about our team
Like what we have to say about building great software and great teams?